|
Basic
Course in Special Effects and Game Programming in Java
by
Aníbal Wainstein
Chapter
2
Your first applet
Last
updated 1999-05-14
CONTENTS
2.0
Your first applet
Now
it is time to start programming your first applets. It is always
a great experience to see your first creations in action.
2.0.1
Inheriting the Applet class
We
have earlier described what an applet
is. In Java there is already a finished class called "Applet".
This is used as the parent class (the base) for all the types of
applets that you create. To do our own applet, we will overwrite
some of the methods in it and put extra variables. This is called
in Object Oriented Programming to inherit the Applet class.
import java.applet.*;

import java.awt.*;


public class myapplet extends Applet {

}
I
know that this was a lot at once but we can start by describing
"import" that makes sure that you have access to the Applet
class and the AWT package. In the AWT package there is the class
String and other important classes that you may need when you make
applets. This is called importing a Java class package. The
"public" declaration indicates that the applet will be
able to be used by other classes (this is something that is necessary
to have with some Java VM's). The "class" declaration
indicates that the applets name will be "myapplet". The
"extends" declaration means that the class "myapplet"
will inherit the Applet class methods. The applet do not do anything
right now, because we have not yet made any changes on the parent
class.
2.0.2
Initializing with the init() method and how to write strings.
The
first change we will do on our applet is to overwrite the init()
method. This method is the first method executed in an applet.
import java.applet.*;

import java.awt.*;


public class myapplet extends Applet {


public void init()

{

    System.out.println("Hello Sweden!");

}


}
Here we
use the built-in method println() (print-line) that exist in the class
"out", which in turn exist in the Java package "System".
With this we write the string "Hello Sweden!" on the Java
console. The Java console is the communication window with the programmer,
which you can display with your web browser when you test the applet.
By using it, we can receive applet error messages and display our
own messages like "Hello Sweden!".
2.0.3
How to compile and run your applet
Save
the code example in the last section as an ordinary text file (it
must be in ASCII and not in Word or similar format). All the applets
require that they are embedded in a HTML page in order to work.
Write the following bit of HTML code into a separate file:
<HTML>
<HEAD><TITLE>My first applet</TITLE></HEAD>
<BODY>
<APPLET CODE="myapplet.class" WIDTH=100 HEIGHT=100>
</APPLET>
</BODY>
</HTML>
Here
we specify that the applet shall use the myapplet.class file as
base and where the width and height is 100 pixels each. I guess
that you already understand how HTML works so I will not explain
what the rest of the text means.
Save and name the file to "myapplet.html" in the same
folder as the Java file.
Depending
if you have Sun's or Microsoft's Java development system, you open
a DOS window in Windows and write the following into the folder
where your Java and HTML files are:
\pathtojavac\javac
myapplet.java (Sun's JDK)
\pathtojvc\jvc myapplet.java (Microsoft's SDK)
The
compilator will examine the file and notify you about the errors
it finds and where they are. A common error that everyone may encounter
is to forget the semi-colon after a Java statement.
Now
you can open the HTML file "myapplet.html" with your favourite
web browser. If you use Netscape, you can open the Java console
under the program menu (look under tools in Netscape 4.X). The same
thing applies to Internet Explorer 4.01 or 4.02. However in version
4.0 of Internet Explorer you must make sure the Java logging option
is on before you look at the applet (this will you find under the
IE advanced settings). The Java log is written as a text file under
the c:\windows\Java\ folder. If you want to spare yourself of this
trouble then just upgrade to version 4.01 or 4.02.
You
can also click here to see the
applet.
2.0.4
Quick ways to show results (showStatus() and println())
The
Java method println() belongs to the PrintStream class, under the
java.io package (IO stands for "In Our" and is used to
note communication with the user or the hard drive). You do not
have to lay much thought on this, because when a Java Virtual Machine
is started you have automatically a println() method ready under
the System class and under it's communication class out. The class
out is pointing on the Java console. By using out you can easily
check the values of your variables.
In section 1.2.3
we looked at the arithmetic operators:
int a = 4;

int b = 2;
//The number 6 will be stored in "c"

c = a + b;


//The number 2 will be stored in "c"

c = a - b;


//The number 8 will be stored in "c"

c = a * b;


//The number 2 will be stored in "c"

c = a / b;
Unfortunately
we could not verify that the result was correct. The method println()
exist for many types of variables. Write the following applet:
import java.awt.*;

public class calculationapplet extends Applet {


public void init()

{

    int a = 4;

    int b = 2;

    c = a + b;

    System.out.println(c);

}


}
After
writing this and compiled it you will be able to see the number 6
on the Java console. Now you may wonder how it may be that the same
println() could write a number, when the same method in the last example
wrote a string. This is called function overloading. They are
NOT the same methods even though they are named the same. If two methods
are named the same but have different arguments, Java will
see them as two unique methods. However you cannot have two functions
that are named the same and where both require identical arguments.
The following println() methods are some of the most used:
println(boolean)

println(String)

println(int)

println(float)

println(double)
When
you run and applet on a web browser you have also access to the
status window that is used to be located at the bottom of the screen.
There is a method under the Applet class that is called showStatus().
With this you can show strings. Let us take the "Hello Sweden!"
example in section 2.0.2 and rewrite
it:
import java.awt.*;

import java.applet.*;

public class myapplet extends Applet {


public void init()

{

    showStatus("Hello Sweden!");

}
}
Compile
it, run this applet on your web browser and look at the status window.
Please note that depending on the web browser you have, this applet
may fail because other system messages may overwrite your status
bar message. Therefore showStatus() may not always be good to use
if you do not update your message continously. We will later see
how you can have fun with it anyway.
2.1
The basics for all the graphics programming in Java
I think
that the most popular area within the applet programming is without
doubt the graphics programming. In these sections we will look at
the most important functions that you must know in order to be a
full fledged graphics programmer.
2.1.1
What is a pixel?
A computer
screen consist of something that you call pixels. A pixel is a color
value that consist of a red, green and blue mix of colors (RGB).
In your TV screen you can see how this works, since each dot consist
of these three colors. By having different shades of these colors
you can get different color. For instance red with green gives yellow,
red with blue gives magenta, and so on. For every pixel in the computer
screen you can set what mix it should use.
Depending
on your graphics card configuration, you can have different types
of resolutions. Two of the most common are 800x600 and 1024x768
pixels (pixels per width and pixels per height). You can also have
different color resolutions, but this is nothing you have to worry
about, since Java takes care of this automatically for you. In section
2.0.3 we had specified that we wanted
an applet 100 times 100 pixels large. This area we call the applet
screen and should generally not be larger than the computer screen's
resolution.
2.1.2
How to mix colors in Java (The Color class)
With
the Color class in Java you can create any color type by specifying
different shades of red, green and blue. Color has different constructors
but we shall mostly work with the following:
public Color(int red, int green, int blue);
In
the constructor we can specify a value between 0 and 255 for each
color. Look at the following example:
//gives black because the value of the three colors

//is 0

Color black = new Color( 0, 0, 0);


//gives blue because all the values are 0 except

//the blue component

Color blue = new Color( 0, 0, 255);


//gives white because all the values are 255

Color white = new Color( 255, 255, 255);
The
color class has default colors that you can use. These exist as
Color variables inside the Color class. Since these variables are
static variables, you do not need to create a Color object
to be able to get to them. We will review static variables later
in this course when we get real use of them. The following colors
exist:
Color black = Color.black;
Color blue = Color.blue;
Color cyan = Color.cyan;
Color darkgray = Color.darkGray;
Color gray = Color.gray;
Color green = Color.green ;
Color lightgray = Color.lightGray;
Color magenta = Color.magenta;
Color orange = Color.orange;
Color pink = Color.pink ;
Color red = Color.red;
Color white= Color white;
Color yellow = Color.yellow;
2.1.3
How to draw on the applet screen with the paint() method (the Graphics
class and the fillRect() method)
I said
in section 2.0.2 that there was the init()
method that was the first thing executed in a Java applet. The method
that is called directly after init() in an applet is the paint()
method:
public void paint(Graphics g)

{
}
With the
paint() method you have full control over the applet screen thanks
to the Graphics object that is included and that is connected to the
screen. In the Graphics class there are methods to draw lines, circles,
rectangles, texts, Images and more. You should always update a graphics
applet by initializing the screen with a certaing background color.
This we can do with the fillRect() method that will draw a filled
rectangle. First we must specify a color that the applet's "pen"
will work with.
Let us say that we want blue color in our applet and that the applet
size must be 200x100 pixels:
import java.applet.*;

import java.awt.*;


public class initbackground extends Applet {


public void paint(Graphics g)

{

     Color backgroundcolor = new Color(0,0,255);


     //setColor() in the Graphics class

     //sets the color of the pen

     g.setColor(backgroundcolor);


     //fillRect() fills a rectangular area with the

     //selected color. The method requires a horizontal

     //and vertival position (x and y position)

     g.fillRect(0,0,200,100);

}


}
Note
that all the communication with the applet screen is done with the
graphics object "g". In the example above we have first
set the color on the pen that the Graphics object will use to draw
on the screen, in this case blue. Next step is to draw a rectangle
that covers the entire screen with the color we have chosen. We
wanted an applet with the dimensions 200x100, therefore we need
to draw a rectangle that is drawn to the left and above (position
0,0) and has the same dimensions as the applet.
NOTE
that if you increase the vertical position y then the rectangle
is moved downwards. An increase of the horizontal position x
moves the rectangle to the right.
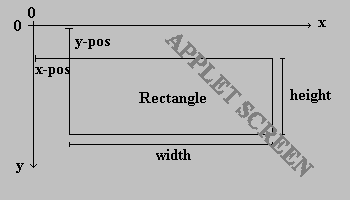 The
fillRect() method's functionality.
The
fillRect() method's functionality.
Now
make a file of the code text above and your own HTML file where
CODE="initbackground.class" and where WIDTH=200 and HEIGHT=100.
You
can also click here to
see the applet.
2.1.4
Other interesting methods in the Graphics class
In the last section we reviewed the Graphics methods setColor()
and fillRect(). There are many methods that you have use for in
Graphics. The following example shows what you can do with some
of them.
 import java.applet.*;

 import java.awt.*;


 public class risingsun extends Applet {


 public void paint(Graphics g)

 {

     //Create the sky.

     g.setColor(Color.blue);

     g.fillRect( 0, 0, 200, 100);


     //Create the sun.

     g.setColor(Color.yellow);


     //The method fillOval() draws a filled oval

     //in the middle of the screen with the height and

     //width 50.

     g.fillOval(25,25,50,50);


     //Create the sun beams with fillArc(),

     //setColor() is not needed because the pen's

     //color will be the same.

     g.fillArc(0,0,100,100,180,10);

     g.fillArc(0,0,100,100,160,10);

     g.fillArc(0,0,100,100,140,10);

     g.fillArc(0,0,100,100,120,10);

     g.fillArc(0,0,100,100,100,10);

     g.fillArc(0,0,100,100,800,10);

     g.fillArc(0,0,100,100,60,10);

     g.fillArc(0,0,100,100,40,10);

     g.fillArc(0,0,100,100,20,10);

     g.fillArc(0,0,100,100,0,10);


     //Create the ground

     //Create brown color, there is no default brown color

     Color ground = new Color(128,64,0);

     g.setColor(ground);


     //Fill the bottom part of the screen with brown

     g.fillRect( 0, 50, 200, 50);


     //Create a black text

     g.setColor(Color.black);

     g.drawString("Hello Sweden!",70,50);

 }


 }
Compile
the code above and make a HTML file, which should be an applet with
the dimensions 200 times 100 pixels.
You
can also click here if you want
to see the end result.
We
start by looking at the statements in the paint() method from the
beginning. The setColor() method in the start, does the same thing
that it did in the initbackground applet in the last section. The
difference is that we now directly specify the color from the Color
class, instead of making a reference to it first. The result is
less code and it will be easier to understand for they who read
it.
After that we set the pen color to yellow and draw a filled circle
in the position (25,25) with the width and height 50. This we do
with the help of the fillOval() method. The next step is to draw
the sun's beams. These are drawn with the fillArc() method. The
method is similar to fillOval() but with the difference that you
can specify an angle (in degrees) that you want the beam to start
from and also a angle width (in degrees).
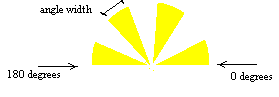 How
fillArc() works.
How
fillArc() works.
Now
we fill the lower half of the applet with brown color that we will
have to create for ourselves, since it does not exist as default
color. We create a rectangle that have half the applet height (Dimensions
200x50) and move it down 50 pixels, which is half the screen.
Finally it is time to add a little greeting with the method drawString()
that we draw in black. The method requires a string and one x and
y position where the text will be positioned. Note that the y position
is a bit misleading. It is the position for the baseline of the
font!

The drawString() method draws strings from the
base.
You
must consider this when you are using drawString(). We will in later
chapters show how you can change the font in the text too.
All
the methods that we have reviewed here, are well documented in the
API reference that you can download from the same place where you
download the development packages. There, you will also find a description
of other useful methods in the Graphics class. It is just as well
that you get used to read the API reference, since it is a tool
that is as important as the compiler. Your are not supposed to memorize
all these functions. If you try that you will only get bored. In
the next chapter we will review threads and you will start making
your first special effects.
Copyright
© 1999-2005 Mandomartis Software Company
|
